Fixing a leaking roof
This topic is for the do it your selfer who is cautiously confident about working on their own roof to fix a leak and to the homeowner/property owner that would like to know more about what goes into fixing a leaky roof.
First let me say that working on roof can be dangerous and result in serious injury or death if not done properly following proper safety procedures. This article is intended for informational purposes only and should not be considered an endorsement or recommendation to perform your own roof repairs.If you are uncertain in any way of your ability to complete fixing a leaking roof safely then call a professional such as Kevin The RoofSmith.
So how do you go about fixing a roof that is leaking?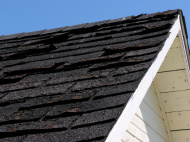
The first thing you will need to do to diagnose your roof leak is determine the type of roof system on the building in question. In general, roofs can be divided into 2 types: either flat/low sloped or steep sloped. A flat roof will have a rise:run ratio of 2:12 or less. A low sloped roof will have a ration 0f 2:12 to 4:12 and a steep slope is considered anything with a rise:run ratio of 4:12 and above. The reason for this distinction when determining the cause of a roof leak is that these different applications use different roofing products and procedures. The different products and applications have unique properties that allow you to trouble shoot the most common areas that may be the source of the leaky roof. One rule of thumb to note: Some roofing products are used fairly exclusively on flat and low sloped roofs and may be applied to steep sloped roofs. Steep slope materials will never be used on a flat roof and rarely on low slope applications. The exception to the rule are some metal roof applications on slopes as low as 2:12 as well as certain shingle applications down to 2:12.
Repairing flat roof leaks
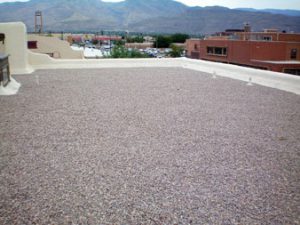
So you’ve determined you roof is flat.Typical systems for residential and commercial flat roofs are: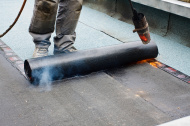
-
Tar and Gravel or T&G
-
Modified Bitumen or Torch-on
-
E.P.D.M. (Rubber)
-
T.P.O.
-
Cold Process Membranes
Tar and Gravel Roof System :
Identifying a T &G roof system is fairly straight forward. Firstly you will see the loose gravel. You will need to broom away the loose gravel to expose the membrane. The gravel on the roof is called “ballast” and serves 2 primary functions. In the case of a pure T&G “built up roof” system the gravel protects the membrane from the suns Ultra Violet radiation which breaks down the water proofing asphalt. The weight of the gravel will also hold the system in place and protect from wind uplift in the case of a “loose laid” system installed without fasteners or adhesives. Once the loose gravel has been removed you should next encounter gravel that is embedded into the membrane below. This is because on a true Tar and Gravel system a successive series of paper felts are mopped together with successive applications of hot asphalt.After 3 or 4 plies of hot mopped plies are installed the roof is then flooded with an asphalt pour into which gravel is then embedded with more loose gravel being poured onto the system to make up the proper weight required to ballast the system.
Sometimes finding a leak can be a little bit tricky because water will always follow the path of least resistance. This means it can travel horizontally in any direction from the leak source before finally finding its way into the building. Certainly it is always best to look directly above where the water is coming into the building to see if there are any obvious signs this area is the leak source. If you find there are roof penetrations such as: plumbing vents or attic vents,heating,air conditioning or ducting units as well as perhaps expansion joints or firewalls these could very well be the source of the leaks. In these cases where there is a roof penetration right above or near where the leak appears in the building it is prudent to inspect this area to ensure the integrity of all seals and flashings.
If it is determined that the integrity of either the roof membrane seal or flashing is the cause of the roof leak then either of 2 procedures should be followed.First, if the flashing unit has degraded because of corrosion due to environmental or chemical exposure then it needs to be removed,discarded and replaced with a new,similar unit sealed accordingly back into the membrane. If it simply a case of the membrane “letting go ” around the unit then the membrane can be reinforced and sealed back to the unit to prevent any further water infiltration.
In either case what one needs to do is remove all loose gravel around the unit back approximately 3 feet. Next you will need to clean the membrane completely so a new seal can be formed. This will require the embedded gravel be “spudded” from the asphalt membrane to achieve a smooth,asphalt surface.
At this point the roof is ready to be re-sealed. One could use hot tar over the affected area to seal breaks in the membrane. However, this method requires a kettle to melt the tar and generally will require more than one person to perform the repair. In our case(and most commonly) we will use a torch applied membrane heat welded to the existing membrane. Membrane on membrane reinforcement provides a tougher,weather proof seal and can be performed easily by only one person.